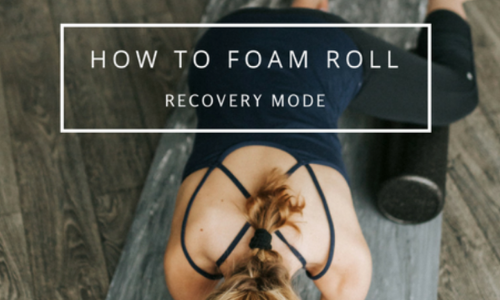
A Guide to Foam Rolling
April 07, 2019
I’m in a love-hate relationship with my foam roller.
On one end, foam rolling can relieve your sore body parts, activate and increase your blood flow, lengthen out your muscles, and allow you to recover faster and come back stronger than before. On the other end, foam rolling can make you cry, it may seem like the biggest chore in the world, and sometimes it can be a bit confusing.
---Find out my favorite foam rollers at the end of this post!
WHAT IS FOAM ROLLING?
Foam rolling is a bittersweet component to anyone’s health and fitness routine. If you think about it, it’s basically like a cheap massage –it uses deep compressions to roll out the knots and get into your muscle fascia. Foam rolling gets into your muscles in a way that stretching does not. By incorporating both stretching and foam rolling into your fitness routine, you will have a well-rounded recovery and mobility regime.

Foam rolling is a great way to cool-down from a workout by allowing your muscles to be soft and pliable. This lengthens and loosens your muscles, making them more likely to recover faster and get you back into a workout stronger than before. Better yet, using a foam roller before a workout can warm-up and activate your muscles, which will boost your overall performance by getting rid of movement inhibiting spots.
In addition to before and after a workout, it can also be used as a workout itself. Check out one of my favorite bloggers Born To Sweat foam roller workout!
HOW DO YOU FOAM ROLL?
As you can see, foam rolling can be an inexpensive (as cheap as $10) way to round out your exercise routine. But, how do you do it?
I’ve come across a lot of people that don’t know how to use the roam roller correctly. They may know one or two moves, but they don’t know how to make a full, well-rounded routine. So I went to my favorite local studio Reve with good friend and foam rolling pro Anna Ackerman to shoot 5 foam rolling moves that hit your entire body and give you that well-rounded foam rolling routine.
But, before we get to the moves, I wanted to give you some major foam rolling tips before you hop on that roller.
5 TIPS FOR FOAM ROLLING
1. Before a workout, foam roll the muscles you plan on using. This will eliminate time wasted on the areas of your body that you won’t be working.
2. After a workout, you want to spend at least 10-15 minutes foam rolling your muscles. This means that whenever you find a tender spot, hold the foam roller there for 30-40 seconds. Take it slow.
3. To warm-up for a workout, foam roll in a faster motion. Spend no more than 10 seconds on each tight area.
4. Depending on your experience with a foam roller, choose a softer one if you’re new to the practice. Choose a harder one or one with bumps if you’re looking to take your practice further.
5. Remember to relax and breathe. Not only does this trigger a relaxation response, but also it allows more oxygen and blood flow for a deeper recovery.
FOAM ROLLING EXERCISES
QUADS
As one of the major muscles in your body, I always start with my quads to get my entire body going. Lay on your foam roller as shown below and slowly move from just above your kneecap up to your hip flexors -pausing at any tender areas. You can also experiment with flexing and pointing your toes, as well as turning your feet outward or inward for a different sensation.

IT BAND
Your IT Band is a major connective tissue that attaches the knee to the hip joint. Studies show you have to target the other areas around it in order to loosen this spot. Place the roller on the side of one of your hips and bend the top leg over your bottom leg to stabilize. Slowly roll from above your knee to your hip joint -pausing at any tender areas. Try leaning forward and back or bending and straightening your bottom leg for a different sensation.


GLUTES
Your glutes control almost every part of your body. They are a major muscle mover, and if overlooked, can be quite detrimental to your recovery efforts. Start by placing the roller underneath your butt area, and cross one leg over your knee in a figure-4 shape. Then, lean over towards the leg that's lifted. This opens up your glute area and allows you to get deeper. Experiment with bending and extending your top leg for a different sensation.


ADDUCTOR (Inner Thigh)
This spot is SO tender for me -proving that I need to be focusing on this area every single time I roll, and I'm sure most of you can agree. Lie down on your stomach and bring one of your legs up to a 90-degree angle from your torso. Place the roller underneath your inner thigh, starting at just above the kneecap and moving towards your pelvic area. Keep your foot flexed and experiment with bending and straighting your leg.


BACK/LATS
A lot of people like to start on this area, but I always find I need to be "warmed up" before moving to this area because it's a very tight area for me. I always finish my routine here. Start by lying on your back. Place the foam roller perpendicular to your body underneath your shoulder blades. Bring your arms either straight overhead (for a deeper feeling) or crossed over your chest (for a softer sensation). Slowly roll from your mid-back to your neck -avoiding your lower back.
For your traps, lean your torso to one side, hitting the area just below your rear delts. Pause on any spots that are tender.

So there's a basic foam rolling routine that hits top to bottom. Have you tried any other foam roller moves before? Or do you have any other tips for foam rolling? Comment below and let me know! I love hearing how foam rolling has helped people out in their fitness journey.
NEED A FOAM ROLLER? CHECK OUT MY FAVORITES BELOW.
For Beginners
For Experts
For the Traveler
For Multitaskers
OUTFIT:
Huge thanks to Reve Cycling Studio for letting us shoot in their gorgeous space!
Images by the lovely Courtney Elizabeth Media


Posted in: wellness
You may also like
Related Posts

Portland Guide
All About Skorts

The Golf Guide